For 32-bit machines, run the following commands:
- sudo rpm -ivh http://linuxdownload.adobe.com/adobe-release/adobe-release-i386-1.0-1.noarch.rpm
- sudo yum install flash-plugin
Then restart firefox. You should have a working flash player by then.
For 64-bit machines, (e.g. my 64-bit AMD machine), i followed the following steps:
- Download the file http://download.macromedia.com/pub/labs/flashplayer10/libflashplayer-10.0.22.87.linux-x86_64.so.tar.gz (3.56 MB)
Extract libflashplayer.so and copied it into
- /usr/lib64/mozilla/plugins/libflashplayer.so
Wednesday, June 24, 2009
Display invisible mouse pointer in Fedora Core 10
I have recently installed fedora core 10 on a P4 machine in the office. During the installation, I have noticed that the mouse pointer is not showing. After the successful installation, still the mouse pointer is not showing. So in order to solve the problem, i followed this steps:
1. Open Terminal
2. become root by
- su
3. run the following command:
- yum install system-config-display
4. after installing system-config-display, enable it by:
- system-config-display
5. edit the file /etc/X11/xorg.conf
6. Add the following, under the "Section Device"
Option "HWCursor" "off"
Option "SWCursor" "on"
7. Reboot your system (ctl - alt - backspace) and hopefully you will have your mouse pointer now...
Wednesday, June 10, 2009
GD library and mod_rewrite issue in Fedora Core 10 (with file permission issues on htaccess and _config.php)
GD Library not Installed:
Lately, I was trying to install silverstripe CMS in my local machine. I have this warning that GD library is not enabled. The simplest thing to do to solve this problem is install GD. Good thing I about fedora core 10 is I no longer have to go to the terminal for simple install/uninstall. So, I just click on System->Add remove Software, then type GD in the search box of the window that appeared.
I just checked(selected) "A module for PHP Applications using GD", then clicked apply. The installer then will do the rest for you like checking for dependencies, downloading etc.
Then, go to System->Services then restart httpd. Then GD should be installed in your system by now.
Enable Mod_rewrite in Fedora Core 10
Aside from the GD library problem, I encountered also another problem during my Silverstripe installation.
"Friendly URLs are not working. This is most likely because mod_rewrite isn't configuredcorrectly on your site. Please check the following things in your Apache configuration; you may need to get your web host or server administrator to do this for you:
edit the httpd.conf file using vi, nano or gedit or any text editor of your choice.
Then, remove the # sign in
LoadModule rewrite_module modules/mod_rewrite.so line.
Then change
AllowOverride None to AllowOverride All
Then don't forget to restart the httpd service.
After solving those problems, I then have a working silverstripe installation in my box. Now, I'm off to exploring silverstripe CMS.....
* If you are having issues on .htaccess and _config.php files, like you have to make it writeable. Then after chmod 777 you still get the same warning, one quick solution to that is set SELinux to permissive.
Lately, I was trying to install silverstripe CMS in my local machine. I have this warning that GD library is not enabled. The simplest thing to do to solve this problem is install GD. Good thing I about fedora core 10 is I no longer have to go to the terminal for simple install/uninstall. So, I just click on System->Add remove Software, then type GD in the search box of the window that appeared.
I just checked(selected) "A module for PHP Applications using GD"
Then, go to System->Services then restart httpd. Then GD should be installed in your system by now.
Enable Mod_rewrite in Fedora Core 10
Aside from the GD library problem, I encountered also another problem during my Silverstripe installation.
"Friendly URLs are not working. This is most likely because mod_rewrite isn't configuredcorrectly on your site. Please check the following things in your Apache configuration; you may need to get your web host or server administrator to do this for you:
- mod_rewrite is enabled
- AllowOverride All is set for your directory"
edit the httpd.conf file using vi, nano or gedit or any text editor of your choice.
Then, remove the # sign in
LoadModule rewrite_module modules/mod_rewrite.so line.
Then change
AllowOverride None to AllowOverride All
Then don't forget to restart the httpd service.
After solving those problems, I then have a working silverstripe installation in my box. Now, I'm off to exploring silverstripe CMS.....
* If you are having issues on .htaccess and _config.php files, like you have to make it writeable. Then after chmod 777 you still get the same warning, one quick solution to that is set SELinux to permissive.
Friday, June 5, 2009
Using Wicd in place of Network Manager
Recently, after assigning a static IP to my fedora core 10 box, i found out that i have to run the command "service network restart" as root everytime I start my PC in order to activate my network.
In order to solve this problem and after reading several blogs and forum posts regarding the problem with assigning static IP in fc10 and network manager problem, i stumbled upon a post about wicd, an open source wired and wireless network manager for Linux which aims to provide a simple interface to connect to networks with a wide variety of settings.
So, without hesitation, I installed wicd in my fc10 box (i have set my box to permissive mode).
Steps in installing wicd.
- login as root (su)
- run the following command
yum -y install python python-devel wget
- download and install wicd using the foll
- disable network manager
service NetworkManager stop
chkconfig NetworkManager off
- Now start wicd
chkconfig wicd on
- Now there will be an entry in Gnome, under applications->internet->wicd network manager
- You might need to restart your pc in order for the tray icon to appear.
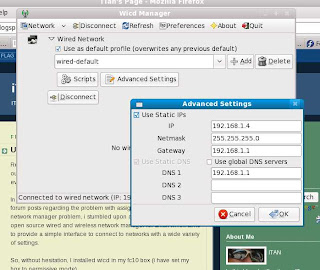
- upon restarting, you can click on the wicd tray icon, click wired network (wireless if you are using one), advanced settings, then you may select to use static ip if you prefer one...
That's it.....
References:
http://wicd.sourceforge.net/download.php
http://wicd.net/moinmoin/Wicd%20on%20FC9
In order to solve this problem and after reading several blogs and forum posts regarding the problem with assigning static IP in fc10 and network manager problem, i stumbled upon a post about wicd, an open source wired and wireless network manager for Linux which aims to provide a simple interface to connect to networks with a wide variety of settings.
So, without hesitation, I installed wicd in my fc10 box (i have set my box to permissive mode).
Steps in installing wicd.
- login as root (su)
- run the following command
yum -y install python python-devel wget
- download and install wicd using the foll
cd /usr/local/src
wget http://downloads.sourceforge.net/wicd/wicd-1.5.4.tar.gz
tar -xf wicd-1.5.4.tar.gz
cd wicd-1.5.4
python setup.py configure
python setup.py install- disable network manager
service NetworkManager stop
chkconfig NetworkManager off
- Now start wicd
chkconfig wicd on
- Now there will be an entry in Gnome, under applications->internet->wicd network manager
- You might need to restart your pc in order for the tray icon to appear.
- upon restarting, you can click on the wicd tray icon, click wired network (wireless if you are using one), advanced settings, then you may select to use static ip if you prefer one...

That's it.....
References:
http://wicd.sourceforge.net/download.php
http://wicd.net/moinmoin/Wicd%20on%20FC9
Assigning Static IP in fedora core 10
If you are using fedora core 10, and tried to assign a static IP to your pc, you might have experience this problem in Network Manager where your assigned subnet mask gets overwritten whenever you tried to save the settings.
SO how do you exactly assigned a static IP to your fedora core 10 box....
- login as root
- turn off Network manager by the following command
chkconfig NetworkManager off
- edit /etc/sysconfig/network-scripts/ifcfg-eth0 set it to the following, replacing IPADDR with your IP
# nVidia Corporation MCP61 Ethernet
DEVICE=eth0
HWADDR=00:24:1d:18:46:ec
ONBOOT=yes
BOOTPROTO=none
USERCTL=no
PEERDNS=yes
IPV6INIT=yes
NM_CONTROLLED=no
TYPE=Ethernet
BROADCAST=192.168.1.255
IPADDR=192.168.1.4
NETMASK=255.255.255.0
NETWORK=192.168.1.0
DNS1=192.168.1.1
- restart network service by
service network restart
Network Device is unmanaged problem in fedora core 10 (fc10)
If you have been tinkering with your network manager in your fedora core 10, you might have encountered this unmanaged network device problem.. (just like what happened to my box...)
Solution:
- login as root
- set to yes in /etc/sysconfig/network-scripts/ifcfg-eth0
NM_CONTROLLED=YES
then under System -> Preferences (in GUI-- gnome), a new connection will appear (automatically, after setting NM_CONTROLLED=YES)
then under System -> Administration, Devices, double click on eth0
then in the new window the appear, check controlled by network manager and activate device when computer starts,
and also automatic obtain DNS.
that's it...
Wolfram|Alpha

Wolfram|Alpha aims to bring expert-level knowledge and capabilities to the broadest possible range of people—spanning all professions and education levels. Our goal is to accept completely free-form input, and to serve as a knowledge engine that generates powerful results and presents them with maximum clarity. - from Wolfram|Alpha Website
More than two weeks ago, Wolfram|Alpha was launched. Wolfram|Alpha is a computational knowledge engine: it generates output by doing computations from its own internal knowledge base, instead of searching the web and returning links.
You can try different things with Wolfram|Alpha, like asking its name, age, etc. You can also plot graphs, chemical formula, finance, geography etc..
How about asking Wolfram|Alpha-- are you a computer?? His answer "I am a collection of computers connected to this cool internet machine thing".
Try it now, its fun.....
Playing with Gmail . . .
In my effort to separate my geeky side from my personal life, i created a new gmail account ... (the one i used for this blog...hehehe --- sorry i'm not a "LOL" fan), which I intend to use for signing up in membership sites, etc. But soon i realized that managing two separate gmail accounts will be tiresome for me and much more waste my limited time.
So, i decided to experiment and explore the features of gmail (which google engineers have stuffed with cool and helpful functionalities).
1. Email forwarding
In the first hand, i want to receive all my emails (from both gmail accounts) in my new gmail account. Good thing is, gmail is already equipped with mail forwarding. What did I do??? First, i logged-in to my old gmail account, clicked on Settings (its in the upper right portion of any page... heheheh),
just selected Forward a copy of incoming mail to, then I typed my new email in the textbox, and selected "keep Gmail's copy in the inbox". And there I have it, I can now receive all my emails in my new gmail account.
2. Replying emails sent to different accounts from my new email
The next thing I want to achieve is reply emails sent to my old account using my new account, but with my old account reflected as the sending email. Good thing, gmail has feature in place...
Steps:
So, i decided to experiment and explore the features of gmail (which google engineers have stuffed with cool
1. Email forwarding
In the first hand, i want to receive all my emails (from both gmail accounts) in my new gmail account. Good thing is, gmail is already equipped with mail forwarding. What did I do??? First, i logged-in to my old gmail account, clicked on Settings (its in the upper right portion of any page... heheheh),
just selected Forward a copy of incoming mail to, then I typed my new email in the textbox, and selected "keep Gmail's copy in the inbox". And there I have it, I can now receive all my emails in my new gmail account.
2. Replying emails sent to different accounts from my new email
The next thing I want to achieve is reply emails sent to my old account using my new account, but with my old account reflected as the sending email. Good thing, gmail has feature in place...
Steps:
- Log in to your old gmail account
- Click Settings (its in the upper right portion of the page... remember??)
- Under Send mail as, click Add another email address.
- A new window will pop-up, in the Name field, enter your full name or any name you want to use.
- In the Email address field, enter the email address you'd like to send from (that is, my old account in my case).
- You can specify a different reply-to address if you want
- Proceed to next step, then you can send the verification email. (You can enter the confirmation code here once you received it in your old email)
- Open your other account (that is, the old account) and either click the link in the message Gmail sent or enter the confirmation code in the window.
- That's it.
Subscribe to:
Posts (Atom)